Use Vendor Order Manager
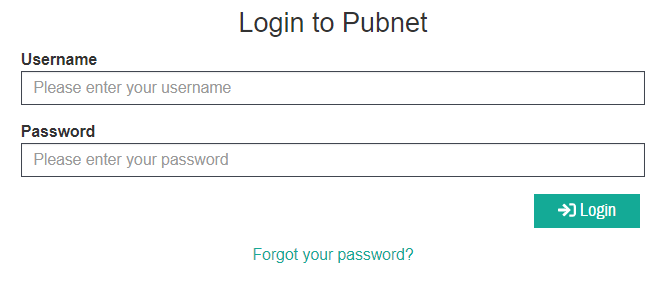
Logging into the Pubnet User Interface
- Test system: https://sandbox.pubnet.org
- Production/Live system: https://www.pubnet.org
- Click on the white “Login” link at the top right
- For the Username, enter your Mailbox ID, normally your SAN. Canadian partners should include “S” at the beginning of the ID.
- For the Password, enter your Mailbox ID’s Password,
- Use the Forgot your password? An email will be sent to you to reset your Password.
- The Tracking tool is the default view after logging in. It is used to track your successfully sent or received documents.
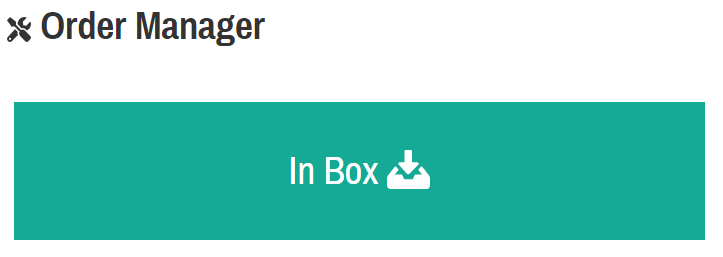
- Click the Order Manager icon.

Processing an Order
- Select the big button for In Box
- To process an order, search for the Purchase Order in the IN Box.
- Inbox is searchable by one or more filters: PO#, Retailer SAN, Ship-To SAN, Date/Time ranges
- Also, filters available for the Purchase Order Status, using the check boxes
- Can show up to 100 results per page, which you might do for Printing.
- Search results are exportable as an Excel worksheet
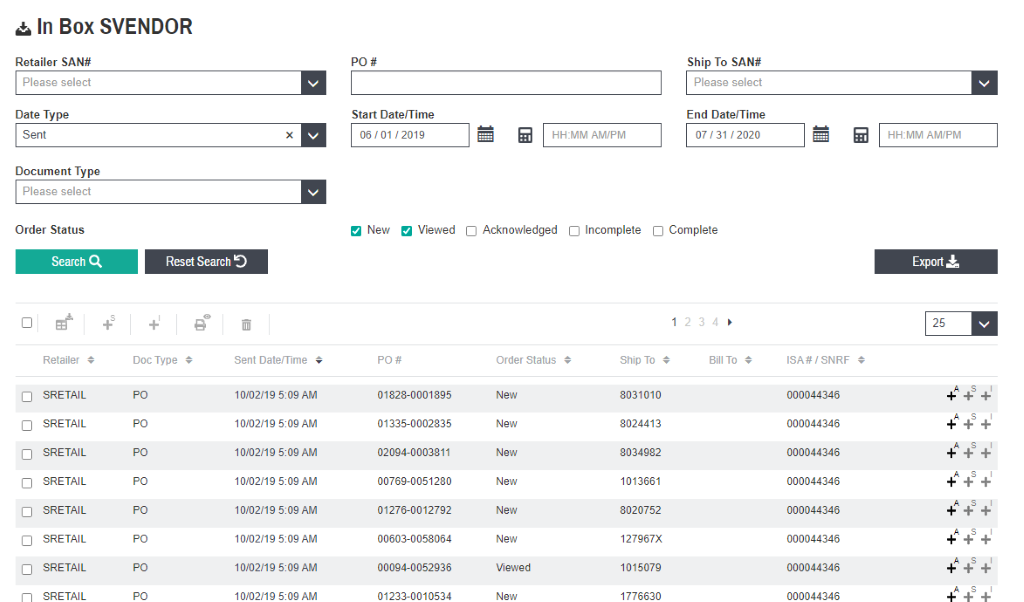
- To print multiple documents at one time, select the documents in search results by clicking on their check boxes and select the Printer icon on left above the search results.
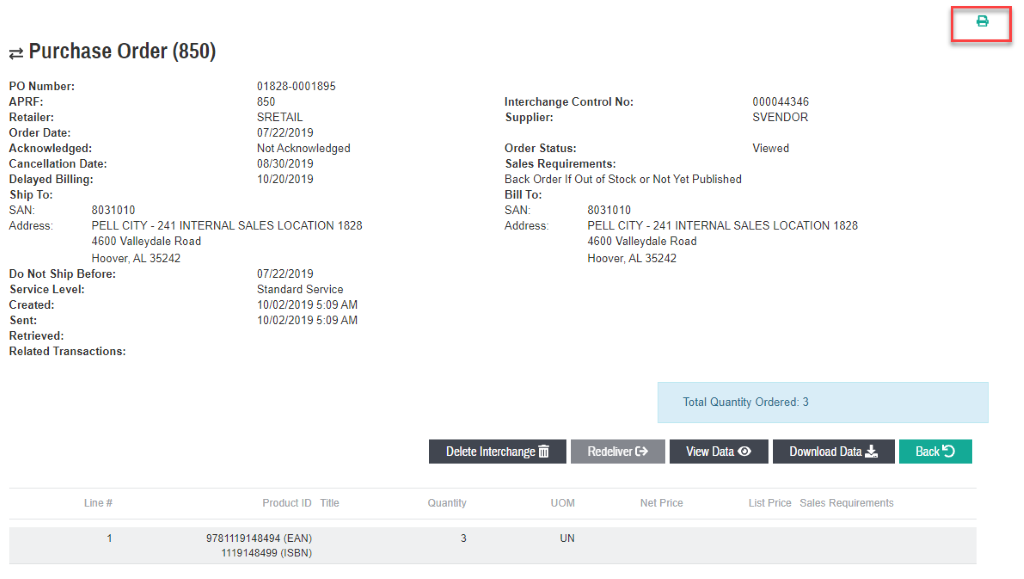
- To see the details of the document, click on the document’s line in search results. The document can be printed using the printer icon in upper right.
Creation of the response documents
- Creation of response documents is done using the + icons on the end of each Purchase Order (PO) lines. The PO’s status will dictate what document type you can create and send and its “+letter” icon will be bold. The For example, if the PO’s status is “New” or “Viewed,” the +A icon (POA) will be bold and the +S and +I will not be bold.
>> A = Acknowledgement, i.e., Purchase Order Acknowledgment (POA)
>> S = Ship Notice
>> I = Invoice
General Instructions for creating documents
- The editable fields that can have information entered or changed have a white rectangular background. Those fields that are grayed out cannot have their information changed.
- Required fields are marked with asterisks which change to checkmarks when correct information is entered. Hovering on asterisk provides helpful information.
- Optional fields are shown with a checkmark on the end. Information can still be entered.

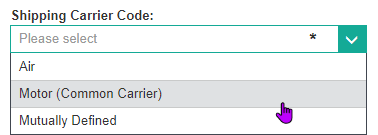
- Fields with drop down menu of choices, click on arrowhead on the right, then click on choice.
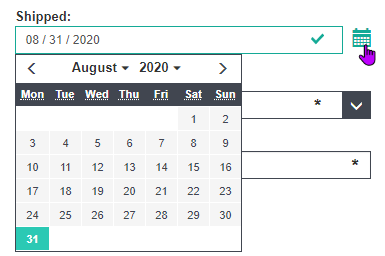
- Date fields have calendar icons that can be used instead of typing in the date:
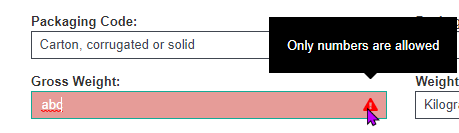
- If an invalid value is entered or required field is not complete, the field will be highlighted in red. Hovering over the triangle with the mouse will show what the issue is:
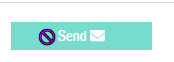
- If trying to “Send” a form with a required field(s) incomplete, the mouse pointer turns to a circle with a diagonal line:
Creating the Acknowledgement (POA)
- The Purchase Order Acknowledgement (POA) is required and must be sent for each Purchase Order (PO) received withing 24 business hours after the PO is retrieved.
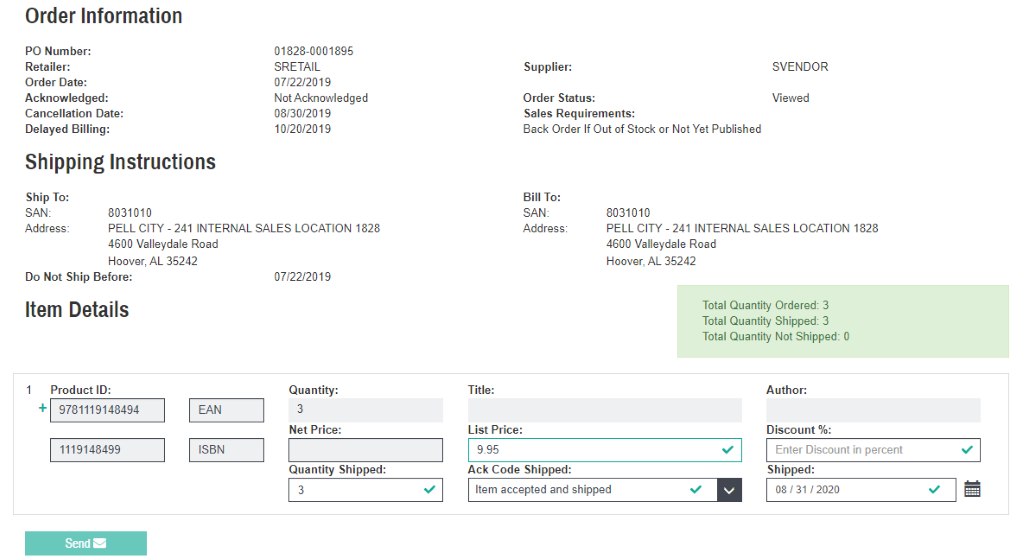
- In the IN Box, search for the PO and click on the +A icon on the end of the PO line to open the Create POA form:

- Information from the Purchase Order is used to prefill many of the fields in the Purchase Order Acknowledgement
>> When “Create Acknowledgement” form opens, for each Line Item, the defaults related to quantities and statuses are:
>> Quantity Ordered is shown under “Quantity”
>> Status (under “Ack Code Shipped”) is “Item Accepted and Shipped”
>> “Quantity Shipped” in the Quantity field to the left of the Status is the quantity ordered and is the same value as seen in “Quantity.” The title of this Quantity field will change depending on the Status that is chosen.
>> “Shipped:” will today’s date.
- If Order can be shipped today for the quantity ordered for all the line items, then nothing needs to be changed on the form and the Send button can be clicked.
- If one or more line items has some or all the Ordered Quantity backordered or cancelled, changes will need to be made to the line item(s) on the form. For each of these line items:
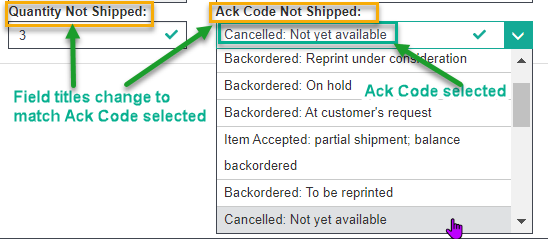
>> Select the appropriate Status from the “Ack Code…” drop down menu; 20 Statuses to select from
Note: The title for “Quantity…” field, “Ack Code…” and “Shipped”/Date field will change depending on the Status chosen. For a Backordered Status, the titles will be “Quantity Backordered” / “Ack Code Backordered” / “Backordered until:.” For a Cancelled Status, the titles will be “Quantity Not Shipped” / ”Ack Code Not Shipped” / “Canceled:”
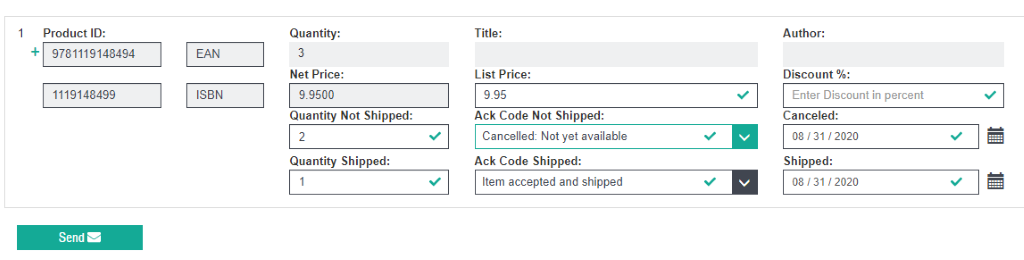
>> Adjust the quantity in this “Quantity…” field, if needed. This Quantity is the number having the Status in the “Ack Code…” field. Do not enter a zero in the “Quantity…” field.
>> If the amount in the “Quantity...” field (left of Ack Code field) is less than the ordered quantity, another line containing a “Quantity Shipped,” ACK code shipped,” and “Shipped” (date) appears. Make the needed changes to this line item fields.
- When all line items have proper responses, click the Send button at the bottom left of the page.
- The “sent” POA will be displayed on the screen.
Creating the Advanced Shipping Notice (ASN)
- The Advanced Shipping Notice is optional (except for BookNet Canada) and is sent after the POA and before the Invoice. Confirm with Bookseller they can accept the ASN before creating/sending it.
- In the IN Box, search for the PO and click on the +S icon on the end of the PO line to open the Create Advanced Shipping Notice form:

- The Create Advanced Shipping Notice form will be displayed.
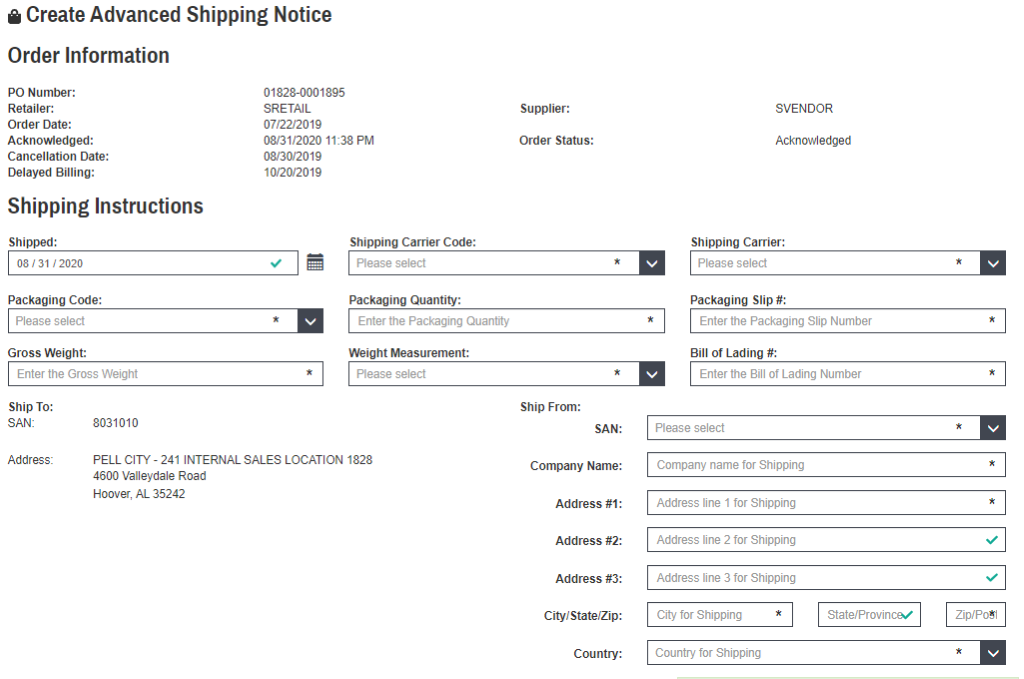
- Information from the POA is used to fill in some of the ASN fields.
- Required fields are marked with asterisks
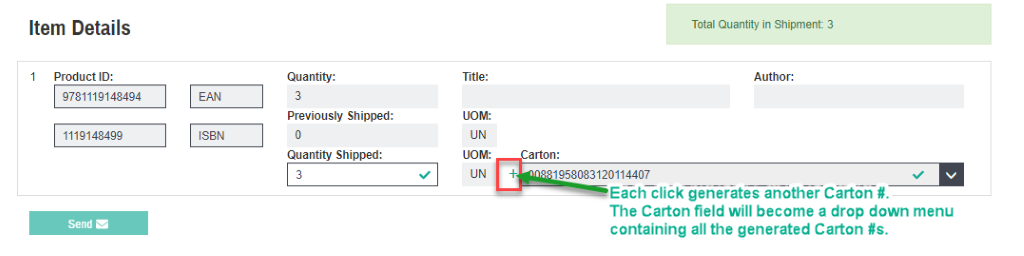
- Carton numbers are automatically generated
- Multiple cartons are supported.
>> To generate additional Cartons/Numbers, click on the “+” in front of any Carton field. The Carton field will become a drop down menu field containing all the generated Carton numbers.
>> For each “Quantity Shipped” amount, select the Carton number from the Carton drop down menu.
- When all required fields have been filled and the items are listed under the correct Carton numbers, click the Send button. The “sent” ASN is displayed on the screen.
- After the Send button is clicked, Shipping Labels and Packing slips are generated and ready to print, if requested. There will be one Shipping Label and one Packing Slip for each carton. To print these,
>> On the “sent” ASN display, click on the “Print Shipping Documents” button

>> Two new tabs on the browser window are added; one for Packing Slips and one for Shipping Labels. One of the tabs will open showing the Print dialog box. Below is shows the Print dialog box for the Packing Slip(s). Finish the Print setup, select the appropriate printer and print the documents (packing slips). Close the window. The second tab will open with the Print dialog box for the other documents (here it will be the Shipping Labels). Finish the Print setup, select the appropriate printer (for shipping labels) and print the documents. Close the tab for shipping labels.
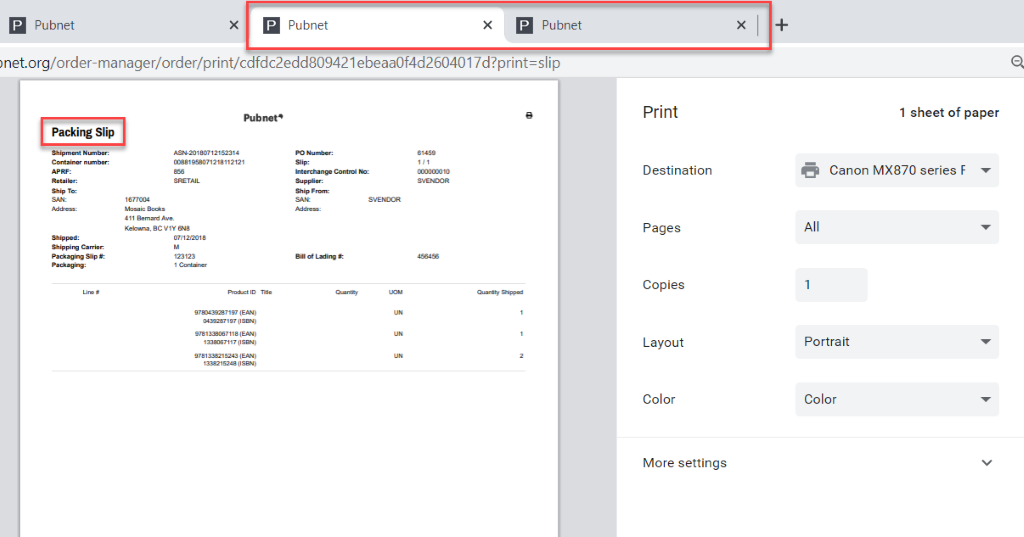
>> You will be returned to the tab containing Order Manager with the sent Advanced Shipping Notice open.
Creating the Invoice
- The Invoice is optional (except for BookNet Canada) and is sent after the Purchase Order Acknowledgement (POA) or Advanced Shipping Notice (ASN). Confirm with Bookseller they can accept the Invoice before creating/sending it.
- In the IN Box, search for the PO and click on the +I icon on the end of the PO line to open the Create Invoice form:

- The Create Invoice form will be displayed. (NOTE: had to substitute the Invoice for another PO)
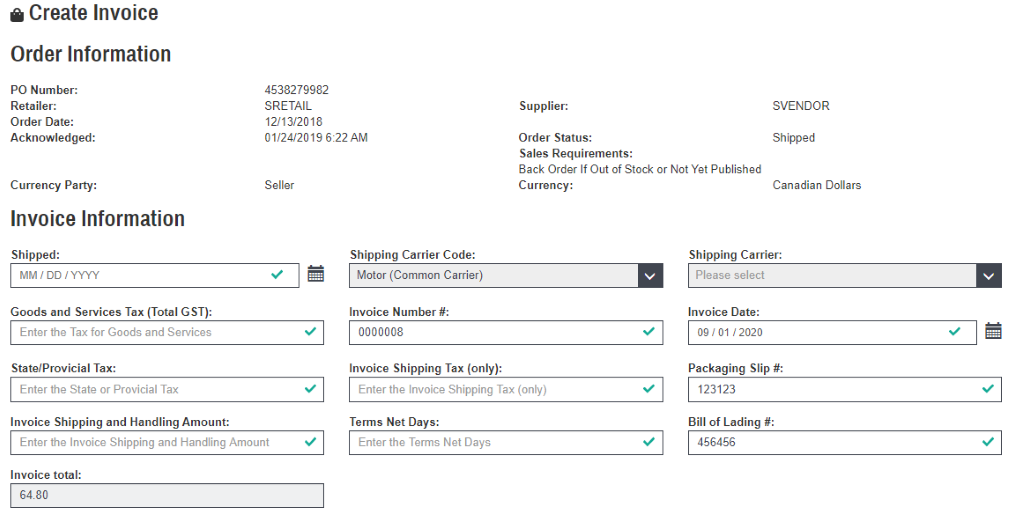
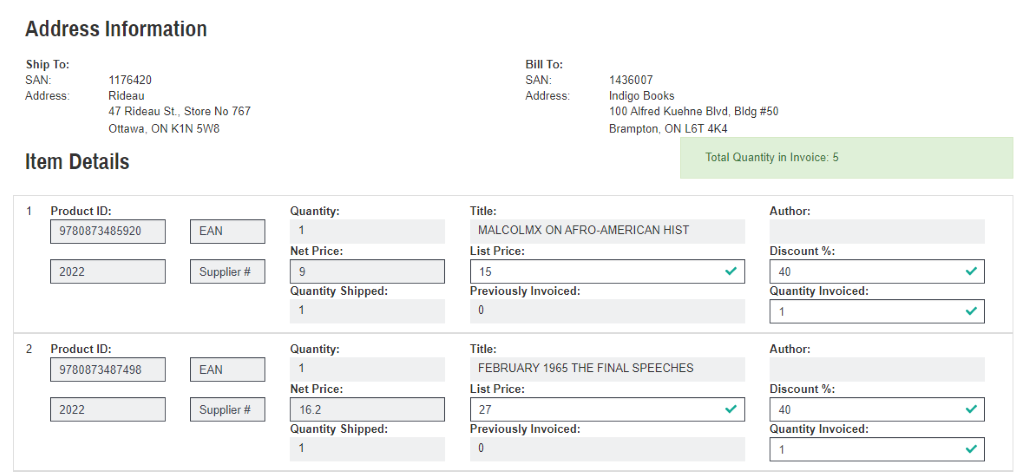
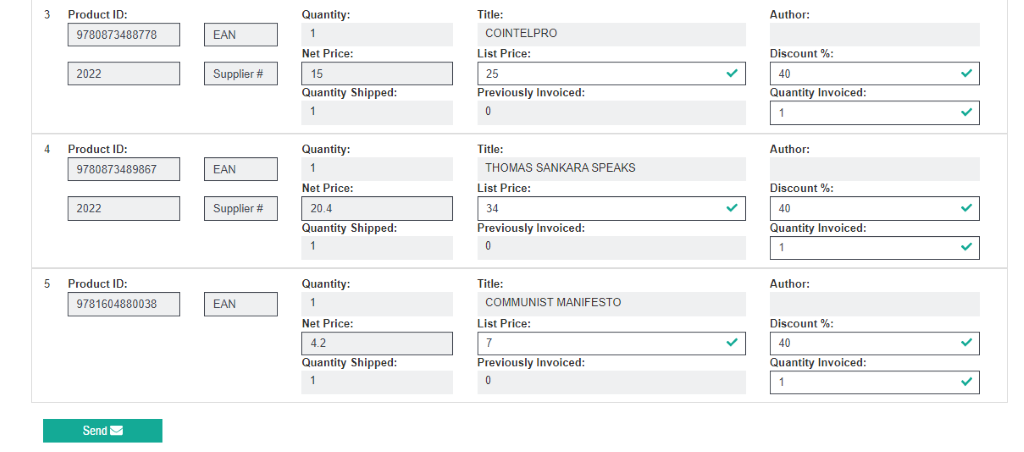
- Information from the POA or ASN is used to fill in some of the Invoice fields.
- Notice that all the editable fields have green check marks (means these fields have valid values). These fields can still be modified.
- Grayed out fields cannot be modified.
- Complete the form, click on the Send.