Anthology Setup
Benefits of Ordering Direct Through Your POS
- Lower cost of goods (better discount, ability to use promo codes for even more discount, qualify for publisher coop)
- Extended payment terms
- Hassle-free returns (fewer restocking charges, increased return limits)
- Centralized ordering (more efficient, better staff communication)
Let’s get you setup so you can start saving time and money today!
Step 1: Get Prepared
- If you are using ISBN-13 format, you need to be on version 9.6.360 (2023) or higher. If your SKUs are in ISBN-10 format you can be on Anthology version 5.16.020 or above.
- Read the Getting Started with Pubnet overview.
- If you haven’t yet registered for Pubnet, register here.
- If you’ve registered but haven’t yet received your Welcome email with your login credentials (or can’t find them), please email supportUS@mvb-online.com.
- Have your store’s SAN number at hand.
- Check the Pubnet Supplier Lists for the SAN numbers of the vendors you wish to setup.
- Make sure your vendors have been told (by you or MVB) that you will be placing orders through Pubnet so they know to look for them. Get an email template!
Step 2: Find Your Vendor in Anthology
- Master Files | Anthology
- Search for the Vendor and select them
- Click the EO tab on the far right
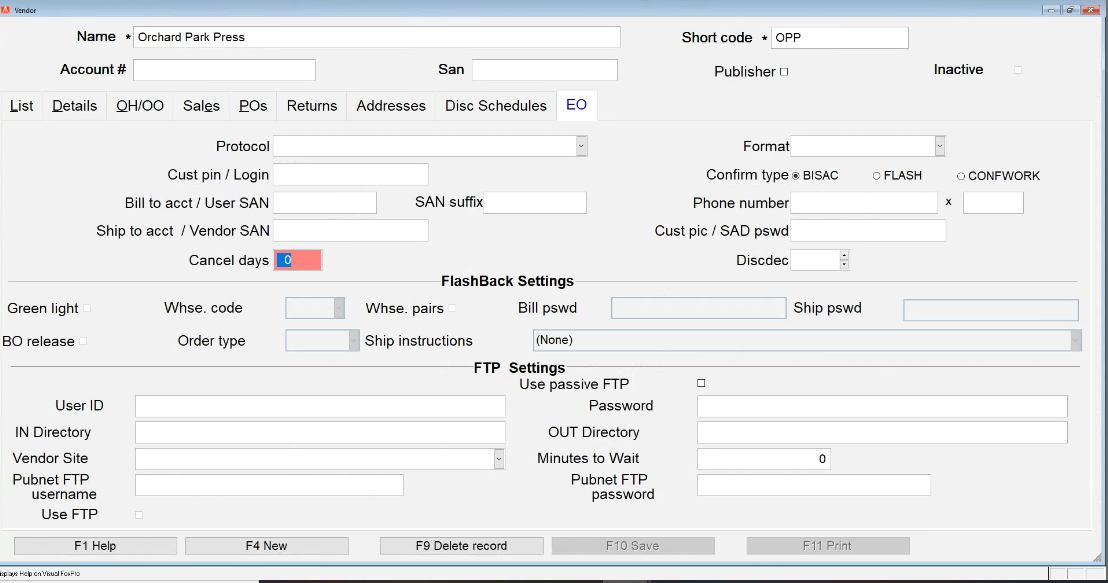
Step 3: Set up the Electronic Ordering (EO) tab
If you’ve never ordered electronically from this vendor before, almost all the fields should be blank.
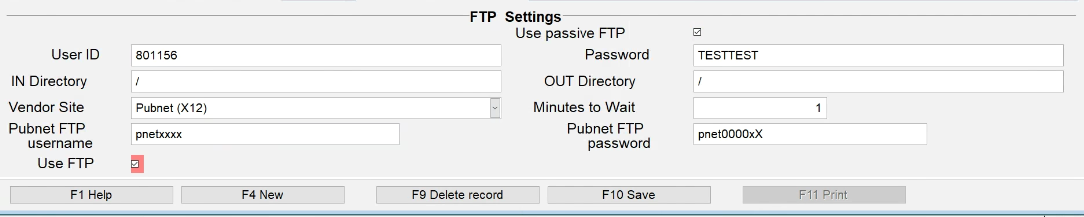
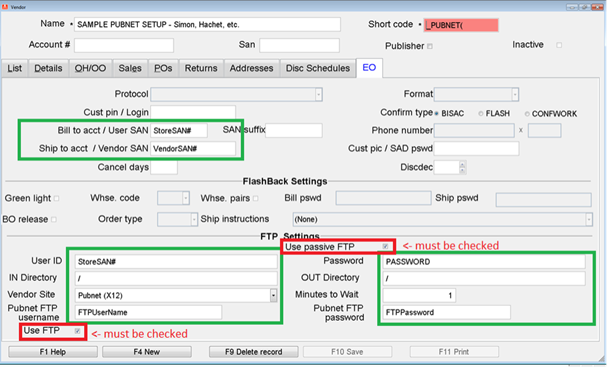
FTP Settings
- At the bottom under FTP Settings, check the Use passive FTP box (near the top of the section).
- In the Vendor Site dropdown, choose Pubnet (X12) for all vendors, including HarperCollins and PRH (ignore separate listings).
- Check the Use FTP box (at the bottom of the section).
- Note: At this point if you get interrupted you should be able to Save your changes. If you try to Save before checking Use FTP, you’ll see a popup error saying “Protocol must be specified.”
- In the FTP Settings, fill in the UserID (same as your SAN), Password, Pubnet FTP username and Pubnet FTP password from your Welcome to Pubnet email.
- Put a forward slash / in the In and Out Directories.
- Keep Minutes to Wait at 0.
- Click the F10 Save
button.
Bill To/Ship To SAN
- In the section of the screen directly under the Tabs, enter your SAN number in the Bill to acct / User SAN box.
- Enter the vendor SAN number as the Ship to acct / Vendor SAN
- Click the F10 Save button.
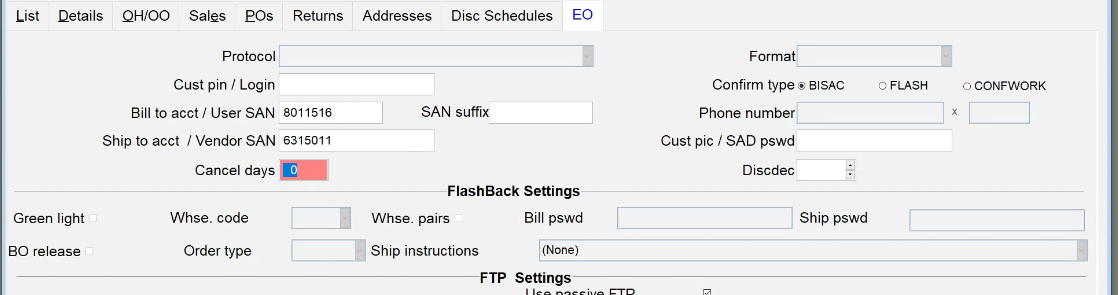
- Double-check that all the required info is filled in.
Step 4: Test with a Real Order
- Build a Draft PO in Anthology that meets the publisher’s order minimum.
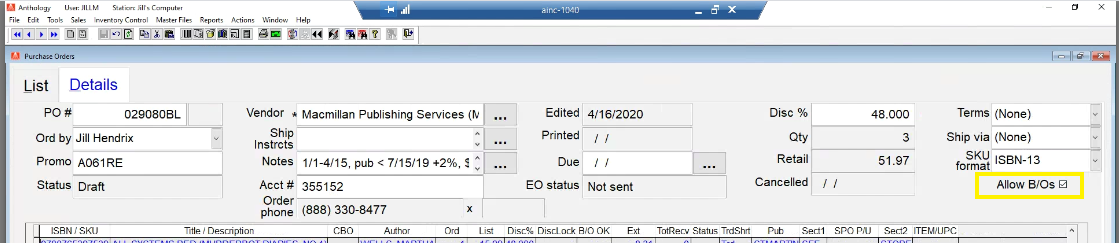
- If you wish to backorder titles, make sure to check the Allow B/Osbox. Otherwise any NYP(not-yet-published) or OOS (out-of-stock) titles will cancel off your order, which could take you below the publisher’s required minimum. For Pubnet orders, the allow backorders setting must be the same for all titles on an order. If you get a warning popup, you can resolve this by choosing Actions | Flow BO Status down. Tip: You can set Allow b/os as a default in the Vendor’s Details tab as wel
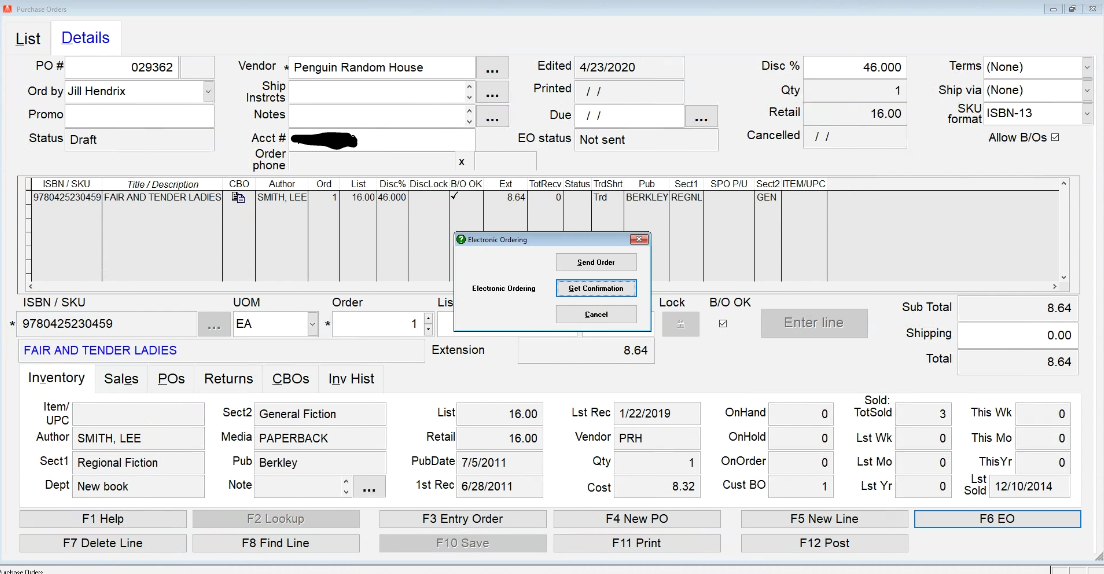
- When you are ready to submit your order, from the Details tab of the PO, click the F6 EO button or choose Actions | Electronic Ordering.
- Click Send Order button.
- Keep an eye out for any messages from your Firewall software. You may have to approve Anthology the first time you send from a station.
- You will not be able to use your Anthology station while the order is sending (approximately a minute or two) so you may want to order from a backroom station or before/after hours.
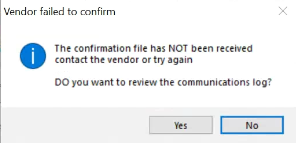
- Once your order is sent, Anthology invariably pops up a message “Vendor failed to confirm”. Don’t worry, this is normal as most vendors are not instantaneously processing orders. Click No to reviewing the communications log
Once you click No, the EO status should change to say “Sent [date]”.
Step 5: Get a Purchase Order Acknowledgment/Confirmation
- Each publisher processes orders on their own schedule and then sends back a Purchase Order Acknowledgment (POA), which Anthology calls a confirmation. Assuming that you've told your
vendors you will be ordering through Pubnet, you should typically receive a confirmation from the Big 5 publishers in less than 24 hours (some take less than 10 minutes) and from all publishers within 48
hours. - You can check for the confirmation as frequently as you’d like. The first time you order from a vendor or if you are using a promo code you’ll want to try to get the confirmation as soon as possible. Otherwise, you may want to build a habit of getting all your confirmations at a set time each day.
- To check for a confirmation, from the Details tab on the PO, click F6 EO or choose Actions | Electronic Ordering.
- Click Get Confirmation.
- If the confirmation is not there, you’ll get the same “Vendor Failed to Confirm” message you saw earlier.
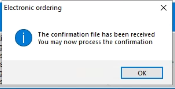
- If the confirmation is received, you’ll get a “The confirmation file has been received” success message.
- Click OK and then you have an option of Viewing/Printing the confirmation to see your discount and whether titles shipped, backorder, canceled, etc.
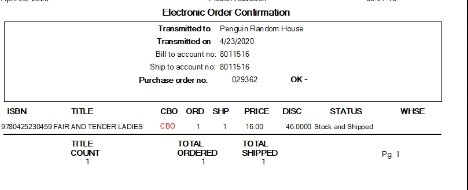
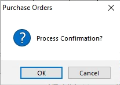
- After you exit out of Printing/Viewing the confirmation you’ll be asked to process it. It would be very unusual not to process the confirmation, so click OK.
- At this point the EO Status will change to Confirmed [date] and your PO Status will change from Draft to Open. If any titles canceled off the PO they will be cascaded to a new draft PO in Anthology. You’ll need to investigate whether those editions are out of print of if you accidentally tried to order them from the wrong vendor (Pubeasy could be a useful tool for this research).
- You may also get a message if list prices have changed asking you if you want to update them in Anthology. Usually, you would do so.
- You now know your Pubnet connection to the vendor is working properly and you may order at will from this publisher.
Step 6: Add More Vendors
Repeat Steps 2-5 for each vendor you wish to set up for direct ordering through Anthology.
Step 7: Set Up Publisher Stock Check
Publisher stock check allows Pubnet users to receive availability status of titles on our sister service, Pubeasy, through your Anthology POS. We have generic credentials available for Pubnet Anthology users, so you no longer need to register for a separate Pubeasy account.
You can stock check titles from suppliers on this list.
If you are currently on Support with Anthology you are eligible to set up publisher stock check.
Email MVB Support or Anthology Support for the credentials and instructions.
Troubleshooting and Support
If you do not receive your order confirmation within 24-48 hours, advanced users can try troubleshooting on their own. Otherwise, contact MVB for help.
Other issues: email us at supportUS@mvb-online.com to set up a support call.