Booklog Setup (College)
Note: These instructions are based on Booklog version 20.5.033. If you are on a different version of Booklog and the directions do not work for that version, please email supportUS@mvb-online.com and tell us what version you are using.
Benefits of Ordering Through Booklog
- Lower cost of goods (better discount, ability to use promo codes for even more discount, qualify for publisher coop)
- Extended payment terms
- Hassle-free returns (fewer restocking charges, increased return limits)
- Centralized ordering (more efficient, better staff communication)
Let’s get you setup so you can start saving time and money today!
Step 1: Get Prepared
- Be a college store on Booklog version 11.1 or above. (The Retail module has different screens. You can set up your vendor credentials from either module; this document will explain how to do so from the Text Management module.
- Read the Getting Started with Pubnet overview.
- If you haven’t yet registered for Pubnet, register here.
- If you’ve registered but haven’t yet received your Welcome email with your login credentials (or can’t find them), please email support@mvb-online.com.
- Have your store’s SAN number at hand.
- Check the Pubnet Supplier Lists for the SAN numbers of the vendors you wish to setup.
- Make sure your vendors have been told (by you or MVB) that you will be placing orders through Pubnet so they know to look for them.
Step 2: Initial Setup
A. If you’ve never ordered directly through Booklog then you’ll need to make an appointment with Booklog Support (773-275-4437 x260 / tech@booklog.com) to enable the free EDI module and register Dart system files on each station you wish to order from.

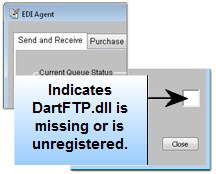
If everything is installed correctly then you should have a lightning bolt icon in the toolbar. Click on that icon to launch the EDI Agent and make sure you don’t get any error messages. Also, verify that there is no white box in the corner of the EDI Agent window. A white box indicates a missing object – e.g. a missing, or unregistered DartFtp.dll file.
B. If you have the lightning bolt icon on at least one station, but not all your stations take these steps on each station you wish to order from:
- Log into the Booklog’s Text Management module as the Admin user.
- Select Maintenance | Parameters | Add Ins.
- Find and select the EDI Interface entry.
- Type or paste "EDI" (without the quotes) into the Access Key field.
- The service download directory will be set to c:\blwin32\. (If you have Booklog installed in a different directory, edit the field to match your Booklog installation. For example, if Booklog is installed on the D: drive, enter d:\blwin32\).
- Make sure that the box next to "Use Passive FTP for Pubnet" is checked.
- Leave all other fields alone.
- Save your changes.
- Log out of Booklog and log back in again.
- Do this on each computer that will transmit or receive via EDI.
Step 3: Make sure your SAN is in the Store Properties Window
- Select Maintenance | Store from the main menu.
- Make sure your SAN is entered in the appropriate field and save.
Step 4: Find Your Vendor in Booklog
- Select Maintenance | Vendors from the main menu. The Vendor Search window will open.
- Search for the vendor you would like to edit.
- Select the vendor record from the search results and click View.
Step 5: Set up EDI settings
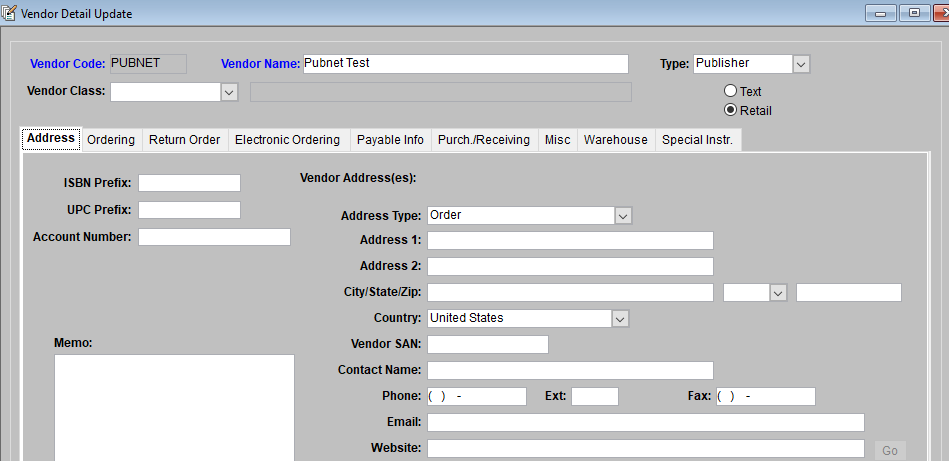
- Type into the Vendor SAN field the SAN for this publisher
- Click the Electronic Ordering tab.
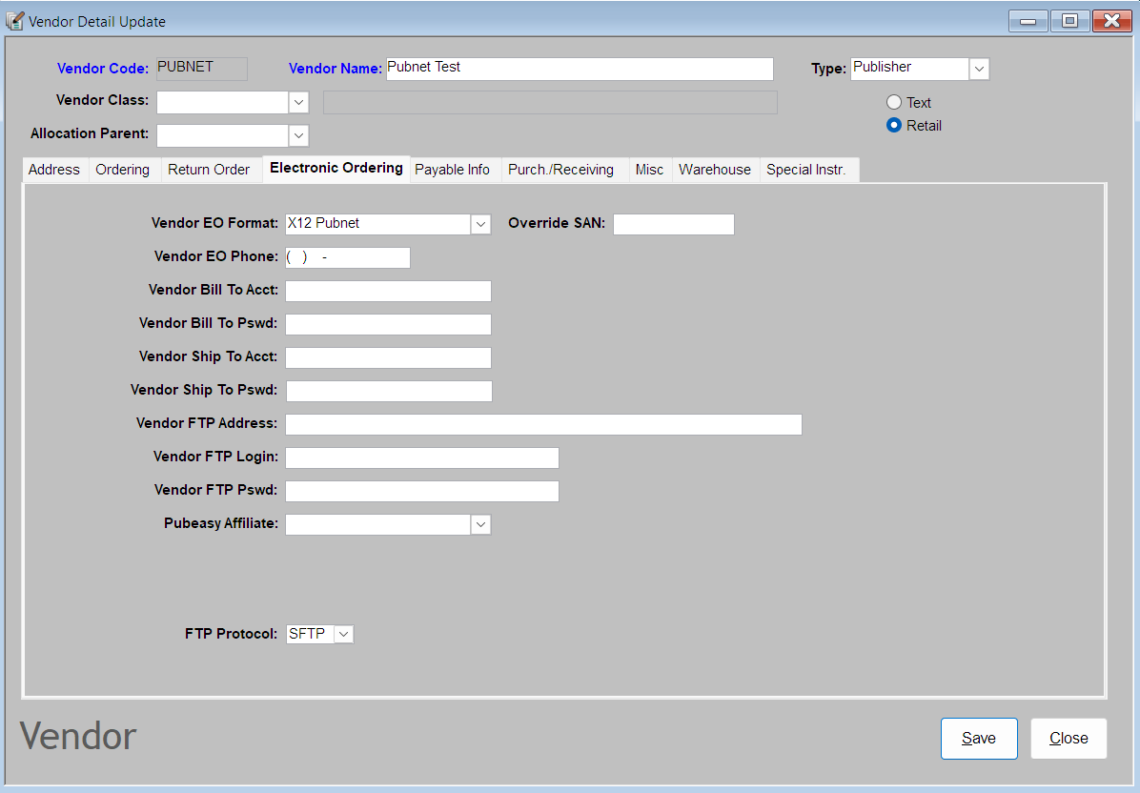
- Select X12 Pubnet from the Vendor EO Format dropdown selector.
- Type your Pubnet User ID (i.e., your SAN number) in the Vendor Bill To Acct field and the Vendor Ship to Acct.
- Type your Pubnet User ID (i.e., your SAN number) in the Vendor Bill To Acct field, the Vendor Ship to Acct, and the Vendor FTP Login field.
- Type your Pubnet password in the Vendor Bill To Pswd, Vendor Ship To Pswd, and the FTP Password fields.
- Type ftp-edi.pubnet.org into the FTP Address field. (Note: This is correct, even though you will be choosing SFTP in the dropdown.)
- Most users will not enter anything in the SAN Override box (this is only if your store SAN doesn’t match your Pubnet SAN for some reason).
- In the FTP Protocol field, select SFTP from the pull-down list.
- Click Save and close the vendor record.
Step 6: Test with a Real Order
- Build a Draft PO in Booklog that meets the publisher’s order minimum. Finalize the PO (setting the ship date if asked.)
- Select the PO in the Purchase Order Pick List in Booklog.
- Click the Transmit button in the lower right-hand side of the picklist window.
- Set your backorder option, transit date, and enter a promo code if applicable.
- Click the Transmit button.
- You should receive a message “The item was successfully saved.” This puts it into your Send Queue. If you do not have the EDI Agent Service set up then you will need to send it manually.
Step 7: Send the Order
- Open the EDI Agent window by clicking the lightning bolt icon in the toolbar.
- On the Send/Receive tab, click Send/Receive All Pending Now. (You can double-check what’s pending by clicking the Purchase Order Queues tab and selecting the Transmission queue radio button.)
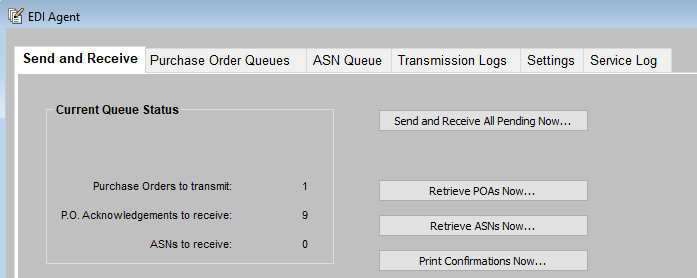

You will receive a message telling you how many purchase orders were sent.
Keep an eye out for any messages from your Firewall software. You may have to approve Booklog the first time you send from a station. If you continue to get an unable to transmit error then contact Booklog support for help opening the appropriate ports on your network.
Step 8: Get a Purchase Order Acknowledgment/Confirmation
- Each publisher processes orders on their own schedule and then sends back a Purchase Order Acknowledgment (POA), which Booklog may also call confirmations. Assuming you’ve told your vendors that you will be ordering through Pubnet, you should typically receive a confirmation from the Big 5 publishers in less than 24 hours (some take less than 10 minutes) and from all publishers within 48 hours.
- You can check for the confirmation as frequently as you’d like. The first time you order from a vendor or if you are using a promo code you’ll want to try to get the confirmation as soon as possible. Otherwise, you may want to build a habit of getting all your confirmations at a set time each day.
- To check for a confirmation, open the EDI Agent (the icon looks like a small lightning bolt) and click the Send/Receive tab.
- Click Retrieve POAs Now…. Alternately, click Send and Receive All Pending Now. Booklog will retrieve any outstanding orders before sending any new ones.
- You will receive a message telling you how many responses were retrieved.After retrieving the POAs, Booklog updates the PO with the confirmed quantities.Click Print Confirmations Now… if you wish to print the POAs to see your discount and whether titles shipped, backorder, canceled, etc. You may also run the PO Acknowledgment – Retail report from the Report picklist. You now know your Pubnet connection to the vendor is working properly and you may order at will from this publisher.Click Close to exit out of the EDI Agent window when you are done.
Step 9: Add More Vendors
Repeat Steps 4-8 for each vendor you wish to set up for direct ordering through Booklog.
Step 10: Set up Publisher Stock Check
Publisher stock check allows Pubnet users to receive availability status of titles on our sister service, Pubeasy, through your Booklog POS. We have generic credentials available for Booklog users, so you no longer need to register for a separate Pubeasy account.
You can stock check titles from suppliers on this list.
Email MVB Support or Booklog Support for the credentials and instructions.
Troubleshooting and Support
Booklog Support: 773-275-4437 x260 / tech@booklog.com
If you do not receive your order confirmation within 24-48 hours, advanced users can try troubleshooting on their own. Otherwise, contact MVB for help.
Other issues: email us at mvb-online@support.com to set up a support call.