IBIDie Setup
Note: These instructions are based on IBIDie version 1.15.16D. If you are on a different version of IBIDie and the directions do not work for that version, please email support@mvb-online.com and tell us what version you are using.
Benefits of Ordering Through IBIDie
- Lower cost of goods (better discount, ability to use promo codes for even more discount, qualify for publisher coop)
- Extended payment terms
- Hassle-free returns (fewer restocking charges, increased return limits)
- Centralized ordering (more efficient, better staff communication)
Let’s get you setup so you can start saving time and money today!
Step 1: Get Prepared
- Read the Getting Started with Pubnet overview.
- If you haven’t yet registered for Pubnet, register here.
- If you’ve registered but haven’t yet received your Welcome email with your login credentials (or can’t find them), please email support@mvb-online.com.
- Have your store’s SAN number at hand.
- Check the Pubnet Supplier Lists for the SAN numbers of the vendors you wish to setup.
- Make sure your vendors have been told (by you or MVB) that you will be placing orders through Pubnet so they know to look for them.
Step 2: Pubnet Vendor Setup
If you’ve never ordered with Pubnet through IBIDie then you’ll need to setup a Pubnet vendor and then register it in your configuration.
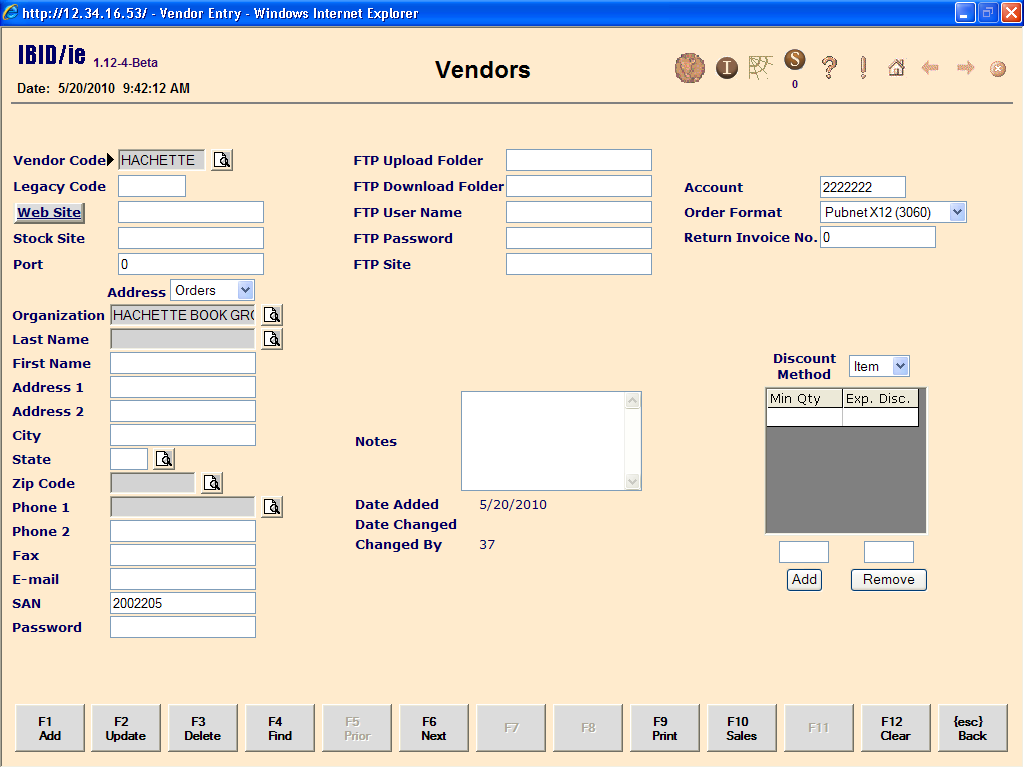
- Display the Vendor Code for Pubnet or create a Vendor Code for Pubnet if one does not already exist in the Vendor Table.
- Enter your Pubnet Password (from your Welcome to Pubnet email) in the Password field – bottom left column
- Fill in both the FTP Upload Folder & FTP Download Folder with: edi.pubnet.org
- Fill in FTP User Name as pn42
- Fill in FTP Password as pn42VL
- Fill in FTP Site with: ftp-edi.pubnet.org
- Account: enter your Pubnet user id (from your Welcome to Pubnet email) – this will probably be your store’s san #.
- Order Format: --None—
- <F1> Add if adding a new Vendor Code or <F2> Update to update an existing Vendor Code.

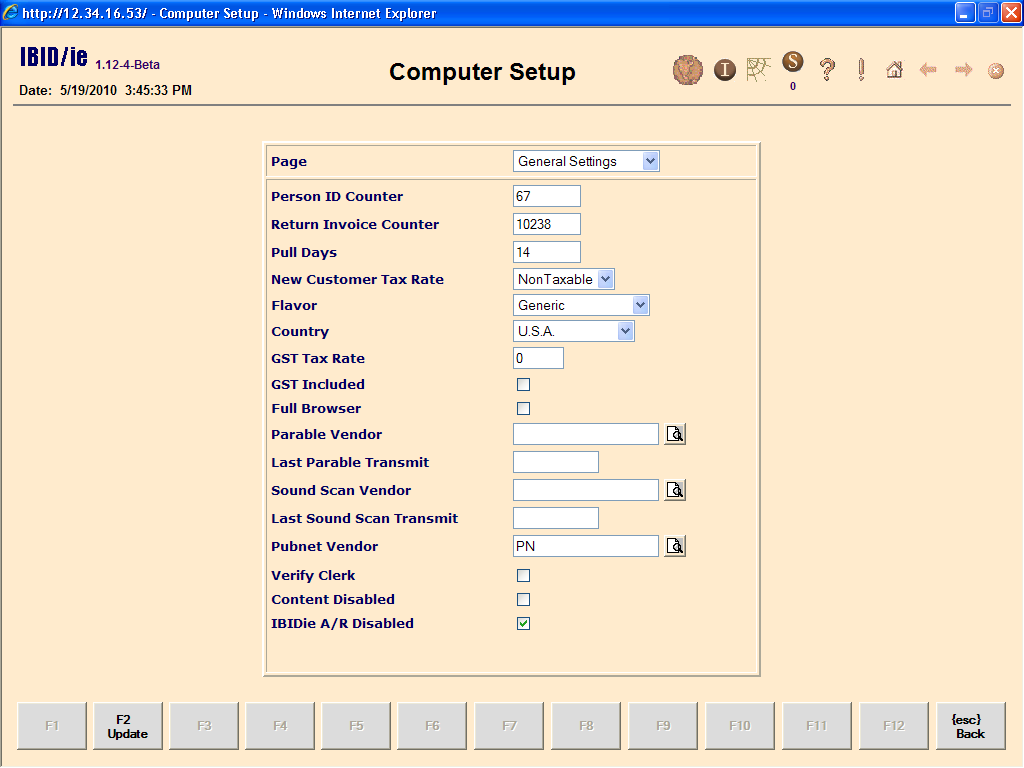
Step 3: Configure Your Pubnet Vendor
- Main Menu
- <F2> Configuration
- <F1> Computer Setup
- Page: General Settings
- Enter the Pubnet Vendor code in the Pubnet Vendor field.
- <F2> Update
- Log completely out of IBIDie and back into IBIDie to store the configuration change.
Step 4: Find/Create Your Vendors in IBIDie
In the Vendor Table, setup or flag each existing Vendor/Publisher that you will be transmitting orders to via Pubnet:
- Create a Vendor Code or display the existing Vendor Code of each Vendor to be transmitted via Pubnet.
- Enter the Vendor’s SAN number in the SAN number field in the lefthand column.
- Select the Order Format that this Vendor uses in the top righthand column [either Pubnet X12 (3060) or Pubnet X12 (4010)]. It is NOT necessary to re-enter all the FTP info from Step 2.
- <F1> Add if adding a new Vendor Code or <F2> Update to update an existing Vendor Code.
Step 5: Test with a Real Order
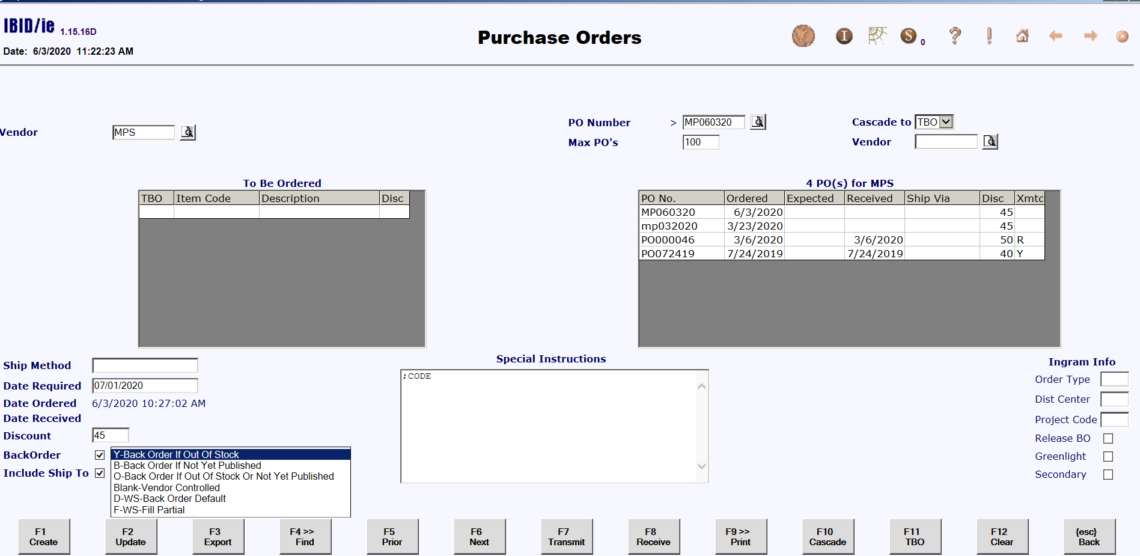
- Make sure to create your order under the specific Vendor/Publisher’s Vendor Code, not the Pubnet Vendor Code record.
- Find your purchase order in the Purchase Orders screen. Since you will have configured the vendor for EDI, the <F7 Transmit> and the <F8 Receive> function buttons will both be active.
- To include a special offer/promotional code, put the special offer code preceded by a semi-colon in the Special Instructions field -- for example ;CODE.
- To backorder, check the Backorder box in the lower left. After checking the Backorder box you can then select from a drop-down list of more specific backorder options. Once you have checked the Backorder box you must also enter a date in Date Required field, which the vendor will treat as the cancellation date for any backordered items.
- To send the order select <F7 Transmit>.
Step 6: Get a Purchase Order Acknowledgment/Confirmation
- Each publisher processes orders on their own schedule and then sends back a Purchase Order Acknowledgment (POA). Assuming you’ve told your vendors that you will be ordering through Pubnet, you should typically receive a POA from the Big 5 publishers in less than 24 hours (some take less than 10 minutes) and from all publishers within 48 hours.
- You can check for the POA as frequently as you’d like. The first time you order from a vendor or if you are using a promo code you’ll want to try to get the POA as soon as possible. Otherwise, you may want to build a habit of getting all your POAs at a set time each day.
- If the POA file is not ready at the time of transmitting the order, you can request the acknowledgment file at a later time via the <F8 Receive> button.
- To view or print the acknowledgment, select [Yes] when prompted to View Report.
- The Xmtd column in PO grid indicates the status of POA file receipts. The letter Y in the Xmtd column indicates the PO has been transmitted but no acknowledgment has been downloaded, while the letter C indicates an acknowledgement (Confirmation) has been received.
Step 7: Add More Vendors
Repeat Steps 4-6 for each vendor you wish to set up for direct ordering through IBIDie.
Troubleshooting and Support
IBIDie Support: 415-863-0997, support@ibid.com
If you do not receive your order confirmation within 24-48 hours, advanced users can try troubleshooting on their own. Otherwise, contact MVB for help.
Other issues: email us at mvb-online@support.com to set up a support call.