Step-by-Step Pubnet Setup Guide
4 Simple Steps
This page walks you through the four steps of Pubnet setup, but you can also get live support by booking an appointment with Jill Hendrix, our Customer Success Specialist.

Step 1: Link Accounts
Each supplier must first approve you to order via Pubnet and link your SAN and Ship-To account number in their back-end systems.
Please take these steps:
- Make a list of your existing supplier Ship-To account numbers and determine your account type for each.
Note: Pubnet works best with terms accounts, but Hachette Book Group and Penguin Random House will link prepaid accounts.
- Use the "Email Your Supplier" template on this page and the contact info at the bottom to request that each supplier configure your Ship-To account for use with Pubnet. If you need contact info for additional suppliers let us know, or you can try emailing your sales rep instead. You can set up everyone at once or set up one supplier at a time, whichever works best for you.
Need Help?
- Your SAN is your Pubnet username and can be found in your Welcome email from us.
- Want to know more about the benefits of terms accounts and how to apply for them? Create a free account at professionalbooksellers.com, login, then click to view the Establish Terms & Save Money webinar.
- Don't have many supplier accounts yet or need help converting them to terms? Contact our Customer Success Specialist, Jill Hendrix, via email or book a Zoom appointment today.
- Not sure what suppliers support Pubnet? See our Supplier Lists.
PRH Nuance: Once you request Pubnet setup from Penguin Random House, they often expect all your electronic orders to come in via that channel. We advise immediately switching your ordering workflows from Pubeasy to Pubnet if applicable once PRH approves you.
Step 2: Configure your POS for Pubnet Ordering
While you wait for approvals from your suppliers, you can work on the next vital step: setting up Pubnet ordering in your point-of-sale system.
Depending on your POS system, your POS provider may do this step for you. If not, our Customer Success Specialist is happy to do a working Zoom call and walk you through it. Or, if you are a DIYer, we have step-by-step instructions for many of the systems.
No matter your POS system, you will need the Welcome email we sent you with your FTP credentials. Please locate that and then follow the directions below for your specific POS.
Note: Once you enter your FTP credentials in your POS, do not use the Forgot password link at pubnet.org as that will reset your password and break your configuration.
Basil, Bookmanager, or Wordstock Users
Please forward your Pubnet welcome email to your POS support team. They will configure your POS for you.
Anthology, Booklog, or IBIDie Users
Please make sure you are on a up-to-date version (minimum version requirements are listed in the documents below) and then set up a configuration appointment with Pubnet or your POS provider or use the do-it-yourself directions below.
Your POS may need some general setup and then you will also need to configure each of your suppliers from Step 1. You will need supplier SANs from our Supplier Lists.
Other POS Users
Please contact your POS support team for help and cc j.hendrix@mvb-online.com.
Step 3: Send Initial Orders & Receive Confirmations
Once a supplier has confirmed they are ready to receive your orders and your POS has been set up for Pubnet ordering, you are ready to send your initial orders!
It's a great idea to build the habit of checking for supplier order confirmations (called POAs - purchase order acknowledgments) into your ordering workflow. These are your proof that the supplier received the order and is processing it. They can also contain valuable information about title status, price & ISBN changes, and discounts.
Depending on your POS, you may also have the ability to request additional supplier documents such as advance shipping notices (ASNs) and invoices.
See below for step-by-step instructions.
Draft and Send Your Initial Supplier Orders
Draft an initial purchase order for each supplier you wish to order from via Pubnet.
Note: The first Pubnet order placed with a supplier takes the longest to process so don't put anything time-sensitive on it. You can use a real order (make sure you know any order minimums that apply) or a test order for a single title publishing a few months from now that you later cancel after the supplier acknowledges it.
Either make an appointment with our Customer Success Specialist to watch you send the order(s) live and verify receipt at our servers, or email her with the PO number(s) and supplier name(s) after you successfully send.
Check for Acknowledgments
After the supplier retrieves your order from Pubnet and processes it, they are required to send back a POA, a purchase order acknowledgment.
In some POS systems (Basil and Bookmanager), the system itself automatically retrieves these acknowledgments. In others (Anthology, Booklog), the user must manually initiate a check.
Please work with your POS support staff or our Customer Success Specialist to ensure you know how to verify that your orders have been confirmed and that your ordering workflow involves checking this for every order sent.
The initial POA from a supplier takes the longest, which is why we like to watch over the process with you. After that, you should receive subsequent POAs from the supplier within 1-2 business days. (The exact frequency varies by supplier -- some may acknowledge within hours.)
Once you've successfully received your first POA from a supplier:
- Contact the supplier to cancel the order if it was test one
- Add a note in your POS for that supplier, so you know electronic ordering is ready to go
Other Documents
Please check this this chart to see what additional documents your POS system may support. If you are not already receiving all available documents from asupplier, you may need to specifically email and request they add on the additional types you would like to receive. Use the same contacts as in Step 1 and ask for 810s for invoices and 856s for Advance Shipping Notices.
Notes:
- If you are using Batch, then your suppliers have already linked your 810s to Batch. You'll need instead to email Batch to request that they forward them to your POS.
- PRH uses a different ASN format than other US suppliers; double-check that your POS supports their ASNs before requesting them and include the name of your POS in your request to PRH.
Need Help?
- Want Pubnet to watch you send orders live? Book a Zoom appointment with Jill Hendrix, our Customer Success Specialist, today.
- If you receive any error messages in your POS when sending purchase orders and/or retrieving acknowledgments, please contact us so we can verify your configuration.
- Are you missing a POA for an order sent more than 2 business days ago, contact our Support Team.
Step 4: Check Price & Stock Availability in Your POS
Many POS systems have also integrated with MVB's sister service, Pubeasy, to allow you to check the price and availability of titles. Your POS may display our results alongside data from wholesalers to help you decide the best supplier for your order.
To see the current list of suppliers who support stock check, click here. Some POS systems include our stock check functionality automatically for all users and other systems require you to be on Support and/or to configure it manually.
To use the publisher stock check service in your POS, most systems use the same Pubeasy account for all users so do not sign up for a separate Pubeasy account unless instructed to do so.
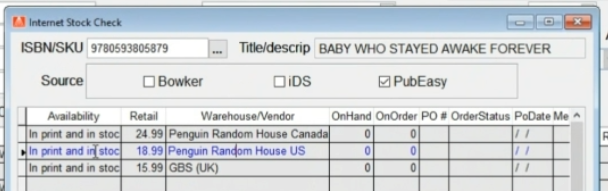
Our stock check results include the publisher's current price and availability status, but not stock quantities. Availability is provided as an availability code (IP) and/or status description such as "In print and in stock". Availability updates are provided by the supplier on a daily basis and so should be considered a guideline, not a guarantee, since status may not be up-to-date for fast-moving titles.
Pubeasy is a worldwide service so we provide worldwide availability results by default. If your POS does not filter the results, as in the below screenshot, you'll need to look for the line for the US supplier.
For directions to enable publisher stock check for your specific POS system, please contact your POS provider or email us for the credentials to use.